Localized Font Textures in Monogame
/For Monogame devs that want sprite font textures which only contain the characters used in your localized text. Created especially for small pixel fonts that might need manual editing of the texture.
Download it here:
TTF2BMPPlus.zip
Version History
1.0.02 - 7/31/202 - Finally fixed the bug where the output image clips the last line of glyphs.
1.0.0.1 - 11/10/208 - UI now saves your previous settings (including text files and output path). Fixes some bugs with texture rendering and the content pipeline.
1.0.0.0 - 11/9/2018 - Initial Release
Overview
You may have discovered that the default font processor in monogame degrades in quality as your fonts get smaller, especially if they are detailed CJK type characters. So next you look into using font textures, but these require you to make an uber gigantic texture with all possible unicode values (I tried making such a texture and indeed even Photoshop would not open it).
So I grabbed a copy of Microsoft’s old TTF2BMP and modified it so that it can read your game’s text files and output only the characters that you use.
I also added a content importer and processor to let the Pipeline tool / MGCB be able to turn these into a working .xnb.
It is not especially pretty or elegant, but it will do what no other tool I’ve found can do. And now you have the source so you can make it better. (Sorry it’s not in Github or the like, but feel free to upload your own copy)
How to Use
Download the TTF2BMPPlus.zip and unpack. There’s a visual studio solution in there.
Add references to Monogame.Framework.Content.Pipeline.Windows and Monogame.Framework.Windows, wherever those my live on your machine. It needs them because it subclasses the default importer/processor.

3. Build and run it. You may recognize the old TTF2BMP interface, but now there is “Choose Text Files” button. Click it and choose whatever files you are using to store your text.
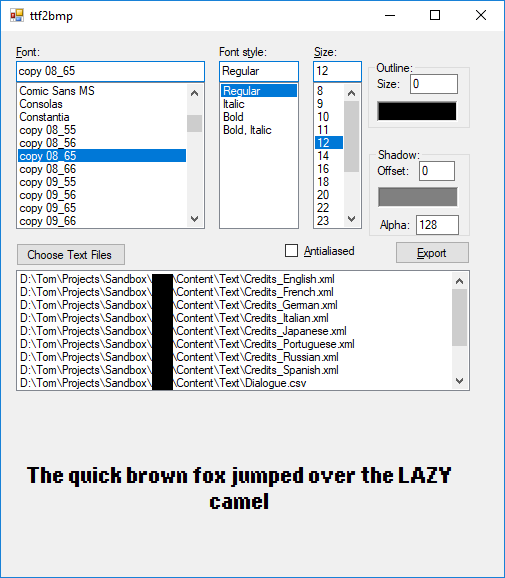
4. Click Export. It will ask you where to save the output bitmap … BUT it is also saving a .txt file of the same name that lists all the unique characters in your game’s text. You need to keep this text file around (add to perforce, etc.) so that the content importer/processor can match up the glyphs to the characters.
5. Go ahead and edit the texture, just don’t move any of the glyphs out of order. Chances are some characters still rendered wonkily, but now you can fix them in photoshop.
6. Open up the MonoGame Pipeline Tool and your content.mgcb file. Select the root node, and at the bottom, add a reference to the ttf2bmp.exe you built earlier. It’s not a dll but you can still add it if you browse by All Files (“*.*”).

7. Now Add the bitmap you just made to the project.
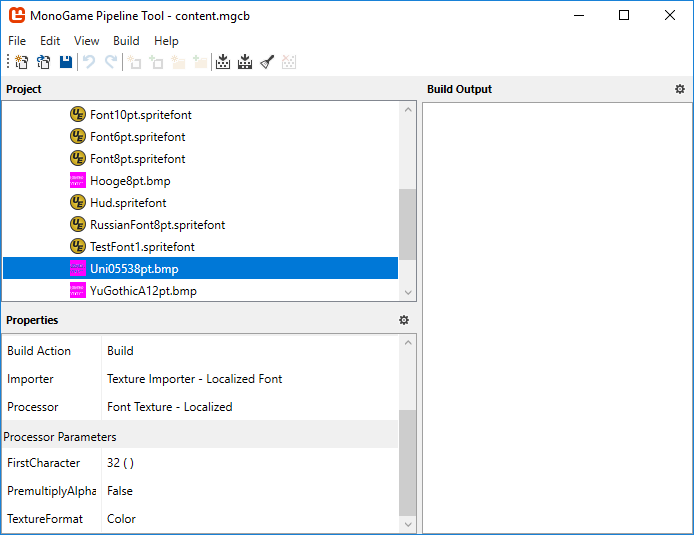
8. Under Importer, choose “Texture Importer - Localized Font”, and under Processor choose “Font Texture - Localized”. Set the ‘FirstCharacter’ field to 0; it remains since we subclassed the default Font Importer, but the default value of ‘space’ gets serialized to an empty string, which causes MGCB to believe it “NeedsRebuild”, unless you change it.
9. Build your content and you should be done with this part.
10. To use the font in game, it works exactly like any other sprite font; just do contentManager.Load<SpriteFont>(fontName) and it should work as usual.